> For the complete documentation index, see [llms.txt](https://talebi.gitbook.io/windows-server/llms.txt). Markdown versions of documentation pages are available by appending `.md` to page URLs; this page is available as [Markdown](https://talebi.gitbook.io/windows-server/vpn/nat-and-routing.md).

# NAT & Routing

<figure><img src="https://2438328698-files.gitbook.io/~/files/v0/b/gitbook-x-prod.appspot.com/o/spaces%2FPf7CIJDZ869PqrsNNvPr%2Fuploads%2Fv3ANKAVleznEbXWKuDOg%2FUntitled%20Diagram.drawio.png?alt=media&amp;token=c455e7b3-e085-4b37-921b-279527fee10d" alt=""><figcaption></figcaption></figure>

### **Overview:** <a href="#epbbb8n5sa6j" id="epbbb8n5sa6j"></a>

In this post, we will be configuring Windows Server as a NAT (Network Address Translation) router to route traffic between local LAN and the internet.

The Windows Server must have two Network Adapters, one configured for the internal local network (LAN) and another one configured to access the internet (Internet).

### **Understanding Test Lab Setup:** <a href="#id-1uv8hzrvhjtn" id="id-1uv8hzrvhjtn"></a>

For this guide, we will use the test lab created in VirtualBox.

* **Windows Server ( two network adapter at least)**

Eth1: 192.168.10.1/24                 Eth2: NAT

* **Windows 10**

Eth1: 192.168.10.100/24           GW: 192.168.10.1/24

Look at the below image for complete IP configuration details for all VMs.

### **Install Routing and Remote Access on Server:** <a href="#id-83a1101qqln" id="id-83a1101qqln"></a>

Let’s install the Remote Access server role on the WS2K19-SRV02 server. Open Server Manager Console.

1\. Click on **Manage** and select **Add Role and Features.**

<figure><img src="https://2438328698-files.gitbook.io/~/files/v0/b/gitbook-x-prod.appspot.com/o/spaces%2FPf7CIJDZ869PqrsNNvPr%2Fuploads%2FedOUGigdL48yoBUkuGpP%2Fimage.png?alt=media&amp;token=d2bf4e4b-a403-4e67-8ee5-0aa62fc3b236" alt=""><figcaption></figcaption></figure>

2\. On the Before you begin page, **click Next.**

<figure><img src="https://2438328698-files.gitbook.io/~/files/v0/b/gitbook-x-prod.appspot.com/o/spaces%2FPf7CIJDZ869PqrsNNvPr%2Fuploads%2FL0D6iaw3aHwiIQEf9ZPr%2Fimage.png?alt=media&amp;token=c996b8db-78e8-4831-92e4-f1ad0ea01f65" alt=""><figcaption></figcaption></figure>

3\. Select **Role-based or feature-based installation** and **click Next.**

<figure><img src="https://2438328698-files.gitbook.io/~/files/v0/b/gitbook-x-prod.appspot.com/o/spaces%2FPf7CIJDZ869PqrsNNvPr%2Fuploads%2FUFrO5PMNbHWyH70SbN2j%2Fimage.png?alt=media&amp;token=18b95c72-191b-4bc1-a525-d2a39a6c5d82" alt=""><figcaption></figcaption></figure>

4\. **Select a server** from the server pool on which you want to install the Remote Access Service role, click Next.

<figure><img src="https://2438328698-files.gitbook.io/~/files/v0/b/gitbook-x-prod.appspot.com/o/spaces%2FPf7CIJDZ869PqrsNNvPr%2Fuploads%2FPeRVhWVOa58FDpwSmojb%2Fimage.png?alt=media&amp;token=304ca79f-4500-45ab-a37a-e94453b0adc4" alt=""><figcaption></figcaption></figure>

5\. On select server roles page, **select the Remote Access Services** checkbox. **Click Next.**

<figure><img src="https://2438328698-files.gitbook.io/~/files/v0/b/gitbook-x-prod.appspot.com/o/spaces%2FPf7CIJDZ869PqrsNNvPr%2Fuploads%2FLeEDFPRot4P3Wb6iUHwN%2Fimage.png?alt=media&amp;token=b6ca2dd2-bcdc-4b8f-b7c3-8c48869741d3" alt=""><figcaption></figcaption></figure>

6\. On select features, **click Next.**

<figure><img src="https://2438328698-files.gitbook.io/~/files/v0/b/gitbook-x-prod.appspot.com/o/spaces%2FPf7CIJDZ869PqrsNNvPr%2Fuploads%2F1siWBlwYEzpAV09eeXL5%2Fimage.png?alt=media&amp;token=bc1c5a41-a6c8-41b1-a8b3-315c8d6e04db" alt=""><figcaption></figcaption></figure>

7\. Read overview information about Remote Access Services and **click Next.**

<figure><img src="https://2438328698-files.gitbook.io/~/files/v0/b/gitbook-x-prod.appspot.com/o/spaces%2FPf7CIJDZ869PqrsNNvPr%2Fuploads%2FBdR2LbaKi4rKqK3sM6lV%2Fimage.png?alt=media&amp;token=f4920bff-b806-4a49-992c-6f34af6a0484" alt=""><figcaption></figcaption></figure>

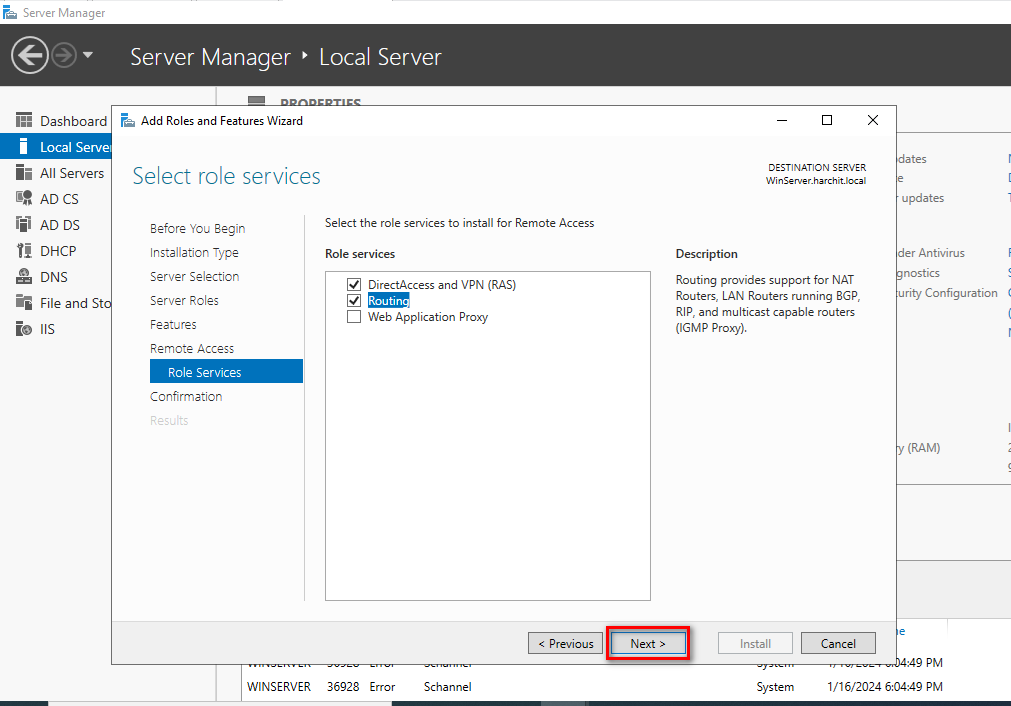
8\. On Select Role Service console, select the **Routing** checkbox to install the LAN Routing role service.

<figure><img src="https://2438328698-files.gitbook.io/~/files/v0/b/gitbook-x-prod.appspot.com/o/spaces%2FPf7CIJDZ869PqrsNNvPr%2Fuploads%2FqfZSaLZEpvVWstWNuCrd%2Fimage.png?alt=media&amp;token=2cde36bb-3a51-4cf2-b932-2e682c9a98b3" alt=""><figcaption></figcaption></figure>

9\. **Click the Add** Features button to add the required feature for LAN Routing. **Click Next** to continue.

<figure><img src="https://2438328698-files.gitbook.io/~/files/v0/b/gitbook-x-prod.appspot.com/o/spaces%2FPf7CIJDZ869PqrsNNvPr%2Fuploads%2FL0hnajVhPx6kFStvFvk1%2Fimage.png?alt=media&amp;token=316c9e75-31b8-4282-809a-d8b7e3d2e0a2" alt=""><figcaption></figcaption></figure>

10\. **Click Next** on the Web Server role services page.

<figure><img src="https://2438328698-files.gitbook.io/~/files/v0/b/gitbook-x-prod.appspot.com/o/spaces%2FPf7CIJDZ869PqrsNNvPr%2Fuploads%2FbUPGB8h2Y2xVHy5nwwKJ%2Fimage.png?alt=media&amp;token=d5307ee7-cf08-4cbc-aeb6-5ef98dbd39ae" alt=""><figcaption></figcaption></figure>

11\. **Click Install** and complete the installation process.

<figure><img src="https://2438328698-files.gitbook.io/~/files/v0/b/gitbook-x-prod.appspot.com/o/spaces%2FPf7CIJDZ869PqrsNNvPr%2Fuploads%2FVp6EpeTFf5SIcdaUYhwB%2Fimage.png?alt=media&amp;token=9b1c2492-46cc-4874-b6ea-32bcb4a6fe44" alt=""><figcaption></figcaption></figure>

12\. **Click Close** to finish the installation.

<figure><img src="https://2438328698-files.gitbook.io/~/files/v0/b/gitbook-x-prod.appspot.com/o/spaces%2FPf7CIJDZ869PqrsNNvPr%2Fuploads%2Fb1pMOgwpYtHr3LmYRGm5%2Fimage.png?alt=media&amp;token=d1df1b55-6767-4282-85e2-91e9a5ef7c30" alt=""><figcaption></figcaption></figure>

### **Configure NAT and LAN Routing on Windows Server:** <a href="#id-2qmxpugeih7" id="id-2qmxpugeih7"></a>

13\. To configure NAT and LAN routing, open the Remote and Routing Access console using the Server Manager console.

14\. **Click on Tools** and **select Routing and Remote Access.**

<figure><img src="https://2438328698-files.gitbook.io/~/files/v0/b/gitbook-x-prod.appspot.com/o/spaces%2FPf7CIJDZ869PqrsNNvPr%2Fuploads%2FrPCiJHVVO8ucvOOVDUzv%2Fimage.png?alt=media&amp;token=030498a1-5c40-4108-a7ee-fedf6914582d" alt=""><figcaption></figcaption></figure>

15\. Select and **right-click on the local server name** and then **select Configure and Enable Routing and Remote Access.**

<figure><img src="https://2438328698-files.gitbook.io/~/files/v0/b/gitbook-x-prod.appspot.com/o/spaces%2FPf7CIJDZ869PqrsNNvPr%2Fuploads%2FtacdP09RwtBQAO58i5Uj%2Fimage.png?alt=media&amp;token=ba049371-741e-428f-b2c4-8082ce41ba8a" alt=""><figcaption></figcaption></figure>

16\. On the welcome page, read the description, and **click Next.**

<figure><img src="https://2438328698-files.gitbook.io/~/files/v0/b/gitbook-x-prod.appspot.com/o/spaces%2FPf7CIJDZ869PqrsNNvPr%2Fuploads%2FsVSwEfUrcNheqXJMCfTO%2Fimage.png?alt=media&amp;token=3834977b-2e41-4432-90ce-9732dcd7c7b2" alt=""><figcaption></figcaption></figure>

17\. On the Configuration page, **select the Network Address Translation (NAT). Click Next.**

<figure><img src="https://2438328698-files.gitbook.io/~/files/v0/b/gitbook-x-prod.appspot.com/o/spaces%2FPf7CIJDZ869PqrsNNvPr%2Fuploads%2FUIvcsVnYEKdWwe1TyN6g%2Fimage.png?alt=media&amp;token=77ecd34a-8543-4c05-a4e9-21b114fb44e2" alt=""><figcaption></figcaption></figure>

18\. On the NAT Internet Connection page, **select the network interface your users will use to connect to the internet. Click Next.   If** the network adapter doesn't show up initially, cancel the wizard  and start configuring . This is  a small bug where the network adapter doesn't show up initially.

<figure><img src="https://2438328698-files.gitbook.io/~/files/v0/b/gitbook-x-prod.appspot.com/o/spaces%2FPf7CIJDZ869PqrsNNvPr%2Fuploads%2F9706ZCFO6tSXNPsMkdES%2Fimage.png?alt=media&amp;token=03f564d1-5b24-4197-9155-ba3896514d5b" alt=""><figcaption></figcaption></figure>

19\. **Click Finish.**

<figure><img src="https://2438328698-files.gitbook.io/~/files/v0/b/gitbook-x-prod.appspot.com/o/spaces%2FPf7CIJDZ869PqrsNNvPr%2Fuploads%2FK0eRNggS8JCigprKCV4u%2Fimage.png?alt=media&amp;token=21a56692-c2f8-457b-a081-e829fc38f8b5" alt=""><figcaption></figcaption></figure>

### **Verify NAT Configuration Settings:** <a href="#mtekmyxv2d7e" id="mtekmyxv2d7e"></a>

20\. On Routing and Remote Access console, **expand the local server name, expand IPv4. Click and Expand NAT.**

21\. **Double-click on the LAN interface.** Verify Interface type is a **Private interface** connected to the private network.

<figure><img src="https://2438328698-files.gitbook.io/~/files/v0/b/gitbook-x-prod.appspot.com/o/spaces%2FPf7CIJDZ869PqrsNNvPr%2Fuploads%2F3jIcfSrknRuCQsdAJj42%2Fimage.png?alt=media&amp;token=fa423a0b-3d3c-4375-87e3-150676340050" alt=""><figcaption></figcaption></figure>

22\. **Double-click on the INTERNET interface.** Verify Interface type is a **Public interface connected to the Internet.** Make sure that **Enable NAT on this interface** checkbox is selected.

<figure><img src="https://2438328698-files.gitbook.io/~/files/v0/b/gitbook-x-prod.appspot.com/o/spaces%2FPf7CIJDZ869PqrsNNvPr%2Fuploads%2FYLwAqB3phuZQurb7qTpX%2Fimage.png?alt=media&amp;token=5a1c8836-d011-4199-87fd-14bdedfdf963" alt=""><figcaption></figcaption></figure>

### **Test NAT functionality from Windows 10:** <a href="#b5c85buqc3h6" id="b5c85buqc3h6"></a>

To test NAT functionality, move to Windows 10 PC.

23\. Open command prompt and ping to google public dns server **(ping 8.8.8.8)**

<figure><img src="https://2438328698-files.gitbook.io/~/files/v0/b/gitbook-x-prod.appspot.com/o/spaces%2FPf7CIJDZ869PqrsNNvPr%2Fuploads%2FKXdBzjt5a8GCqXiN8YCk%2Fimage.png?alt=media&amp;token=f1588aa7-8bee-458c-a5b8-cf9ddff52598" alt=""><figcaption></figcaption></figure>

24\. Open the web browser and access [www.google.com](http://www.google.com/).

<figure><img src="https://2438328698-files.gitbook.io/~/files/v0/b/gitbook-x-prod.appspot.com/o/spaces%2FPf7CIJDZ869PqrsNNvPr%2Fuploads%2FkNw0F0gKF03CRxqB5Rvx%2Fimage.png?alt=media&amp;token=d129fa97-da32-43e4-8cd2-18e48e62b5fc" alt=""><figcaption></figcaption></figure>

25\. If the user can access the [www.google.com](http://www.google.com) website successfully, that means NAT is working properly.

### On Windows Server 2022 NAT Router

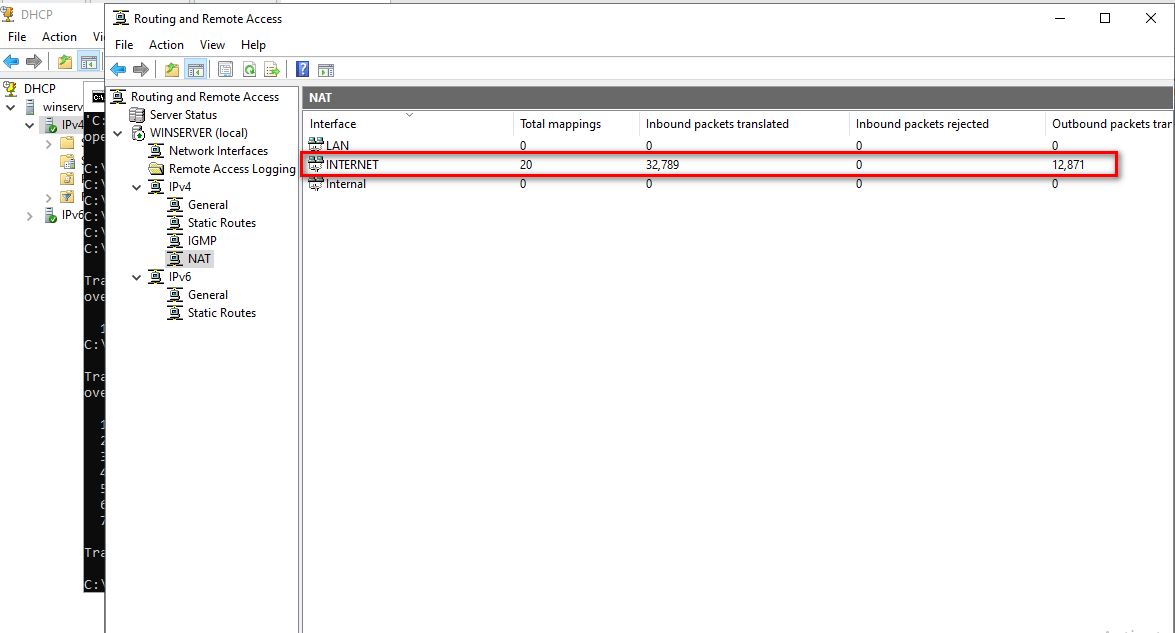
26\. **Click on NAT** and you should see that packets have been translated.

<figure><img src="https://2438328698-files.gitbook.io/~/files/v0/b/gitbook-x-prod.appspot.com/o/spaces%2FPf7CIJDZ869PqrsNNvPr%2Fuploads%2FfvArGC2dKTyezycDvI9e%2Fimage.png?alt=media&amp;token=6f98e51a-a0cf-4229-aa7c-f0efa752350c" alt=""><figcaption></figcaption></figure>