> For the complete documentation index, see [llms.txt](https://talebi.gitbook.io/windows-server/llms.txt). Markdown versions of documentation pages are available by appending `.md` to page URLs; this page is available as [Markdown](https://talebi.gitbook.io/windows-server/vpn/vpn-sstp.md).

# VPN SSTP

### **Secure Socket Tunneling Protocol (SSTP):** <a href="#nznnim7eooz3" id="nznnim7eooz3"></a>

Secure Socket Tunneling Protocol (SSTP) is a tunneling protocol developed by Microsoft. SSTP uses a TCP connection (port 443) for tunnel management.

SSTP provides a mechanism to encapsulate PPP traffic over the SSL channel of the HTTPS protocol. The use of PPP allows support for strong authentication methods such as EAP-TLS. SSL or TLS provides transport-level security with enhanced key negotiation, encryption, and integrity checking.

{% hint style="info" %}
You should use a certificate from public CA in the production environment. As we are just testing the SSTP configuration, so we will use a self-signed certificate in this guide.
{% endhint %}

<figure><img src="https://2438328698-files.gitbook.io/~/files/v0/b/gitbook-x-prod.appspot.com/o/spaces%2FPf7CIJDZ869PqrsNNvPr%2Fuploads%2FixRUwvpxCuNay0xSUqPF%2Fimage.png?alt=media&amp;token=9e63eb5e-22b2-40f5-aff5-92fce328358b" alt=""><figcaption></figcaption></figure>

### **Understanding the SSTP Test Lab:** <a href="#weyk50d6hj3d" id="weyk50d6hj3d"></a>

* **Windows Server ( two network adapter at least)**

Eth1: 192.168.10.1/24                 Eth2: NAT

* **Windows 10**

Eth1: 192.168.10.100/24        GW: 192.168.10.1/24

### **Step:1 Install Remote Access Server role on Windows Server 2019:** <a href="#xntbubx1fhyc" id="xntbubx1fhyc"></a>

**1.** The first step is the installation of the Remote Access Server role. **Open Server Manager Console** and **start role and feature installation wizard**. Select the **Remote Access Server role.**

<figure><img src="https://2438328698-files.gitbook.io/~/files/v0/b/gitbook-x-prod.appspot.com/o/spaces%2FPf7CIJDZ869PqrsNNvPr%2Fuploads%2FbRu1y67rzdyKTD6IRDGA%2Fimage.png?alt=media&amp;token=c053cf45-3a4d-48b6-af80-e58513c3be40" alt=""><figcaption></figcaption></figure>

**2.** On select role services, **select DirectAccess and VPN (RAS)** role service. Click **Next** and **finish** the installation.

<figure><img src="https://2438328698-files.gitbook.io/~/files/v0/b/gitbook-x-prod.appspot.com/o/spaces%2FPf7CIJDZ869PqrsNNvPr%2Fuploads%2FCRs7O0pjAeajtMhDYcTM%2Fimage.png?alt=media&amp;token=77c37178-2998-483d-ac03-69c784ad452d" alt=""><figcaption></figcaption></figure>

**3.** When the installation finished, **click on Open the Getting Started Wizard.** Leave the console open, and move to the next step to create a self-signed certificate.

<figure><img src="https://2438328698-files.gitbook.io/~/files/v0/b/gitbook-x-prod.appspot.com/o/spaces%2FPf7CIJDZ869PqrsNNvPr%2Fuploads%2FY3WdRVty8y6ZodOul4JT%2Fimage.png?alt=media&amp;token=09fc422e-0039-4d4a-920c-88f25c3d0381" alt=""><figcaption></figcaption></figure>

### **Step 2: Create a Self-signed Certificate using the IIS manager.** <a href="#i4e9nkuizdx8" id="i4e9nkuizdx8"></a>

**4.** On the member server, **open the Server Manager console**. Click on **Tools** and **select Internet Information Services (IIS) Manager.**

<figure><img src="https://2438328698-files.gitbook.io/~/files/v0/b/gitbook-x-prod.appspot.com/o/spaces%2FPf7CIJDZ869PqrsNNvPr%2Fuploads%2FHrngSOuC6934DmJ0J83m%2Fimage.png?alt=media&amp;token=3c703f8d-1236-4ac2-8f1b-0b89d3886920" alt=""><figcaption></figcaption></figure>

**5.** **Click on the server name** (Windows Server) in the connections column on the left and **double-click on Server Certificates.**

<figure><img src="https://2438328698-files.gitbook.io/~/files/v0/b/gitbook-x-prod.appspot.com/o/spaces%2FPf7CIJDZ869PqrsNNvPr%2Fuploads%2FtNtSeoF7yFzEV9pNi5pb%2Fimage.png?alt=media&amp;token=9bcba95f-c7f9-410e-a38f-8fe595c4de5a" alt=""><figcaption></figcaption></figure>

**6. Click on Create Self-Signed Certificate** in the Actions column on the right.

<figure><img src="https://2438328698-files.gitbook.io/~/files/v0/b/gitbook-x-prod.appspot.com/o/spaces%2FPf7CIJDZ869PqrsNNvPr%2Fuploads%2FVUxeFNOhpBuqgj2lsYOY%2Fimage.png?alt=media&amp;token=9ced4362-8215-4037-8a50-3d8b76d7053e" alt=""><figcaption></figcaption></figure>

**7.** **Enter the friendly name** you wish to use to identify the self-signed certificate, and then **click OK** to complete the process.

<figure><img src="https://2438328698-files.gitbook.io/~/files/v0/b/gitbook-x-prod.appspot.com/o/spaces%2FPf7CIJDZ869PqrsNNvPr%2Fuploads%2FvvtnHU4icAkmvcZQDrkC%2Fimage.png?alt=media&amp;token=f814d486-93e7-41dd-aa91-3ce332f7abc5" alt=""><figcaption></figcaption></figure>

**8.** You now have an IIS Self Signed Certificate listed under Server Certificates. **Double-click on Certificate**. **The validity of the Self Signed Certificate is one year. Take a screenshot**

<figure><img src="https://2438328698-files.gitbook.io/~/files/v0/b/gitbook-x-prod.appspot.com/o/spaces%2FPf7CIJDZ869PqrsNNvPr%2Fuploads%2F28MaJzOp6FbSKYS5wHnM%2Fimage.png?alt=media&amp;token=f30922dc-4612-4524-bf8d-a72bf6100c83" alt=""><figcaption></figcaption></figure>

### **Step 3: Export a self-signed certificate:** <a href="#id-8bi2lkuxovsn" id="id-8bi2lkuxovsn"></a>

**9. Click on the Details tab**. **Click on Copy to File.**

<figure><img src="https://2438328698-files.gitbook.io/~/files/v0/b/gitbook-x-prod.appspot.com/o/spaces%2FPf7CIJDZ869PqrsNNvPr%2Fuploads%2FNEJj1tlGWfX1Epr5giue%2Fimage.png?alt=media&amp;token=827370d5-9bc6-4d10-8434-cee64bd3f69f" alt=""><figcaption></figcaption></figure>

**10.** Select **No, do not export the private key.** **Click Next.**

<figure><img src="https://2438328698-files.gitbook.io/~/files/v0/b/gitbook-x-prod.appspot.com/o/spaces%2FPf7CIJDZ869PqrsNNvPr%2Fuploads%2FngL50CC55AWIZFrboCid%2Fimage.png?alt=media&amp;token=78553d77-5c13-42b8-9861-8a9e0ae70acd" alt=""><figcaption></figcaption></figure>

**11.**&#x4C;et the default format be **X.509. Click 'next'**

<figure><img src="https://2438328698-files.gitbook.io/~/files/v0/b/gitbook-x-prod.appspot.com/o/spaces%2FPf7CIJDZ869PqrsNNvPr%2Fuploads%2FRFrHrgFsz3c1PYQNgSsG%2Fimage.png?alt=media&amp;token=fa00cab8-2f0f-473f-8d7f-cd179cc4943f" alt=""><figcaption></figcaption></figure>

**11.** Specify the **location to save the file**. **Click Next.**

<figure><img src="https://2438328698-files.gitbook.io/~/files/v0/b/gitbook-x-prod.appspot.com/o/spaces%2FPf7CIJDZ869PqrsNNvPr%2Fuploads%2FqoP8bqUAXV80tPvPcQvs%2Fimage.png?alt=media&amp;token=91c0e110-d29f-4d91-bcf0-eab28ede9713" alt=""><figcaption></figcaption></figure>

**12.** **Click on Finish.** Click on OK on the confirmation message console.

<figure><img src="https://2438328698-files.gitbook.io/~/files/v0/b/gitbook-x-prod.appspot.com/o/spaces%2FPf7CIJDZ869PqrsNNvPr%2Fuploads%2FoJT5YVx8ZnDbILjQxzc7%2Fimage.png?alt=media&amp;token=65132071-b8ea-4d97-ad80-4552f911f4f5" alt=""><figcaption></figcaption></figure>

{% hint style="info" %}
You need to copy this .cer certificate file to Windows 10 machine. The simple way to do this is by sending this .cer file using an email.
{% endhint %}

### **Step 4: Configuring Remote Access Service and SSTP VPN:** <a href="#tn4u4v3y1wp1" id="tn4u4v3y1wp1"></a>

**13.** On configure Remote Access page, **click on Deploy VPN only.**

<figure><img src="https://2438328698-files.gitbook.io/~/files/v0/b/gitbook-x-prod.appspot.com/o/spaces%2FPf7CIJDZ869PqrsNNvPr%2Fuploads%2FjaCaznVzAeX3ILz3lziD%2Fimage.png?alt=media&amp;token=6fd38718-0be5-473d-a902-cf3c9a8419a7" alt=""><figcaption></figcaption></figure>

**14.** That will open the **Routing and Remote Access Management Console.** You can also open the management console from the Tools menu.

<figure><img src="https://2438328698-files.gitbook.io/~/files/v0/b/gitbook-x-prod.appspot.com/o/spaces%2FPf7CIJDZ869PqrsNNvPr%2Fuploads%2F14PaHm2usw5bHeZQQBNE%2Fimage.png?alt=media&amp;token=d584aeab-4dc5-43af-9ad4-b8be23068681" alt=""><figcaption></figcaption></figure>

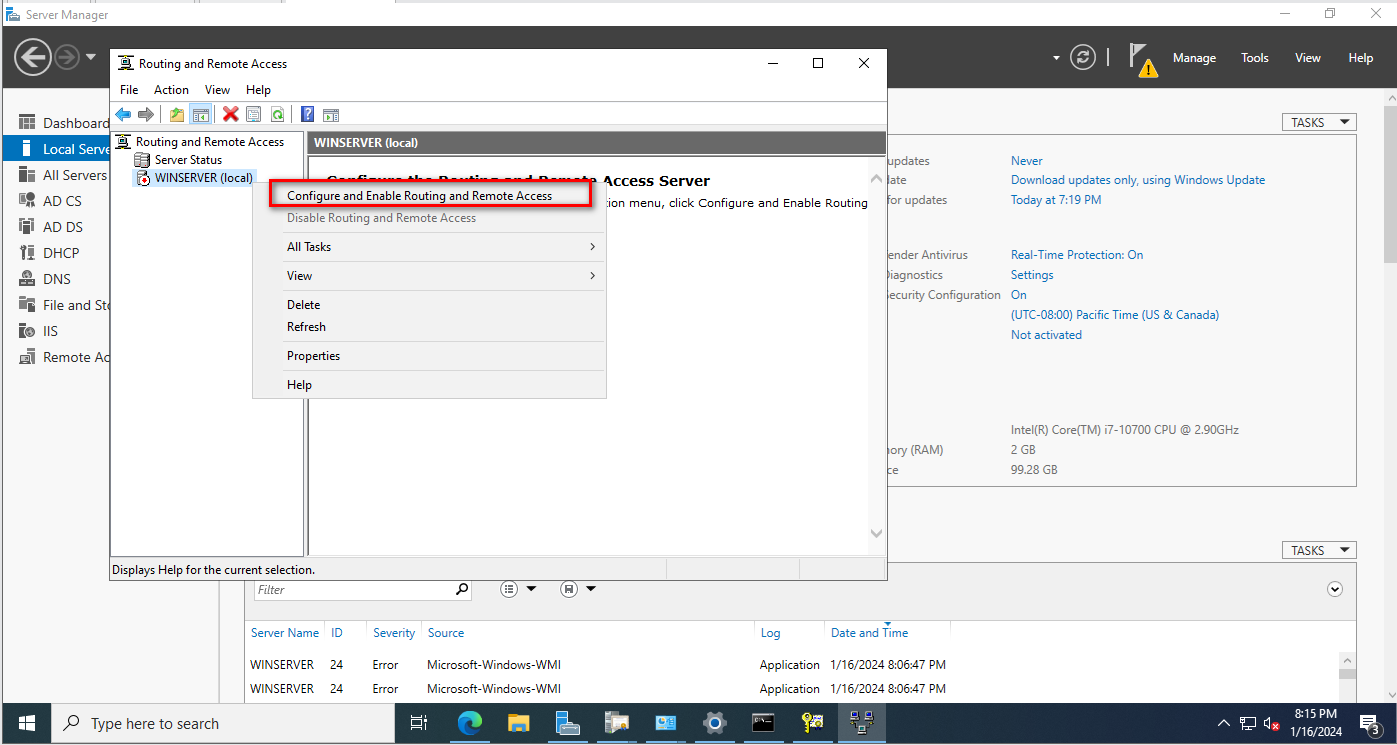
**15. Right-click on the Server name** and s**elect Configure and Enable Routing and Remote Access.**

<figure><img src="https://2438328698-files.gitbook.io/~/files/v0/b/gitbook-x-prod.appspot.com/o/spaces%2FPf7CIJDZ869PqrsNNvPr%2Fuploads%2F1Nk6xnVfa9EKrwybxIoA%2Fimage.png?alt=media&amp;token=7406628a-6ac2-46d3-bd04-83496dfaea77" alt=""><figcaption></figcaption></figure>

**16.** On Welcome screen, **click Next.**

<figure><img src="https://2438328698-files.gitbook.io/~/files/v0/b/gitbook-x-prod.appspot.com/o/spaces%2FPf7CIJDZ869PqrsNNvPr%2Fuploads%2F5jtNTFC18QSfyQaaXLSo%2Fimage.png?alt=media&amp;token=953d4ab2-3048-43ed-bda1-c0720835fbfc" alt=""><figcaption></figcaption></figure>

**17.** On the Configuration page, **select the Custom configuration** radio button. **Click Next.**

<figure><img src="https://2438328698-files.gitbook.io/~/files/v0/b/gitbook-x-prod.appspot.com/o/spaces%2FPf7CIJDZ869PqrsNNvPr%2Fuploads%2FZjMW1li8FczPNRcb0iEx%2Fimage.png?alt=media&amp;token=7acb8a0c-66e6-44f9-bda3-08d4e84d7352" alt=""><figcaption></figcaption></figure>

**18.** On the service page, **select VPN Access. Click Next.**

<figure><img src="https://2438328698-files.gitbook.io/~/files/v0/b/gitbook-x-prod.appspot.com/o/spaces%2FPf7CIJDZ869PqrsNNvPr%2Fuploads%2F6J1J1HjhLYOdsogqjHB3%2Fimage.png?alt=media&amp;token=6bae53d4-ca6c-419f-acec-941ace4733a3" alt=""><figcaption></figcaption></figure>

**19.** After clicking on the **Finish**, it will ask you to start the service. **Click on Start service.**

<figure><img src="https://2438328698-files.gitbook.io/~/files/v0/b/gitbook-x-prod.appspot.com/o/spaces%2FPf7CIJDZ869PqrsNNvPr%2Fuploads%2Fz8HiFoYqfhnNgTQtdr2X%2Fimage.png?alt=media&amp;token=de2b6f5b-fa75-4e60-a840-3063911358b4" alt=""><figcaption></figcaption></figure>

**20.** Now you will see a green up arrow beside your server name.

### **Step 5: Configure SSTP settings and specify the IP Address range:** <a href="#hyzgdh4puxs4" id="hyzgdh4puxs4"></a>

To configure SSTP VPN, we need to set up specific settings in the VPN server’s properties section.

**21.** **Right-click on the server name** and **click on Properties.**

<figure><img src="https://2438328698-files.gitbook.io/~/files/v0/b/gitbook-x-prod.appspot.com/o/spaces%2FPf7CIJDZ869PqrsNNvPr%2Fuploads%2F8NwXzvy5JJOEwyLvNFSL%2Fimage.png?alt=media&amp;token=a1e9e3c5-1fed-4a87-90ec-17af72c0d34c" alt=""><figcaption></figcaption></figure>

**22. Click on the Security tab**. Under SSL Certificate Binding, **select the self-signed certificate** that you just created earlier.

<figure><img src="https://2438328698-files.gitbook.io/~/files/v0/b/gitbook-x-prod.appspot.com/o/spaces%2FPf7CIJDZ869PqrsNNvPr%2Fuploads%2F2LJAGG91WQSWN8XRCneQ%2Fimage.png?alt=media&amp;token=0cf411ae-a2d2-4afd-862e-61203c529180" alt=""><figcaption></figcaption></figure>

**23. Click on IPv4 Tab**. **Select the Static Address Pool radio** button.

<figure><img src="https://2438328698-files.gitbook.io/~/files/v0/b/gitbook-x-prod.appspot.com/o/spaces%2FPf7CIJDZ869PqrsNNvPr%2Fuploads%2FsHysDT7bMxLlT0LGlcE7%2Fimage.png?alt=media&amp;token=a45d2ee6-4ab4-483d-b6b0-3a6ac7881be3" alt=""><figcaption></figcaption></figure>

**24. Click on Add** and **specify the IP address range**. **Click on OK.**

<figure><img src="https://2438328698-files.gitbook.io/~/files/v0/b/gitbook-x-prod.appspot.com/o/spaces%2FPf7CIJDZ869PqrsNNvPr%2Fuploads%2FzaCHGuCCMkjiUh7MOicm%2Fimage.png?alt=media&amp;token=e1745326-6354-48e9-a705-1c3ae88432b7" alt=""><figcaption></figcaption></figure>

**25.** **Click on Apply** to save the changes to the VPN server. It will ask to restart the Routing and Remote Access service. **Click on yes** to do so.

<figure><img src="https://2438328698-files.gitbook.io/~/files/v0/b/gitbook-x-prod.appspot.com/o/spaces%2FPf7CIJDZ869PqrsNNvPr%2Fuploads%2FCMHHExr6vSMb5vJAB084%2Fimage.png?alt=media&amp;token=33590cd1-7df3-47ba-95f1-7a3ac40de4a2" alt=""><figcaption></figcaption></figure>

### **Step:6 Create a User and allow dial-in access:** <a href="#y8b8t0rsmq7z" id="y8b8t0rsmq7z"></a>

**26.** Create a user as follows:

User: vpn

Pass: Abc\@1234

<figure><img src="https://2438328698-files.gitbook.io/~/files/v0/b/gitbook-x-prod.appspot.com/o/spaces%2FPf7CIJDZ869PqrsNNvPr%2Fuploads%2FiffCXf5ff7l6dXL8pJ7g%2Fimage.png?alt=media&amp;token=96931f70-d8b2-4c16-8dcc-0ecfa7fca827" alt=""><figcaption></figcaption></figure>

<figure><img src="https://2438328698-files.gitbook.io/~/files/v0/b/gitbook-x-prod.appspot.com/o/spaces%2FPf7CIJDZ869PqrsNNvPr%2Fuploads%2Fj8mD5aZO2LtroqIKHVBh%2Fimage.png?alt=media&amp;token=c6972c10-dcec-4c69-a135-a494fb68bbb6" alt=""><figcaption></figcaption></figure>

**27.** Enable dial-in access for selected VPN users by opening the user properties and **selecting Allow access on the tab Dial-in.**

<figure><img src="https://2438328698-files.gitbook.io/~/files/v0/b/gitbook-x-prod.appspot.com/o/spaces%2FPf7CIJDZ869PqrsNNvPr%2Fuploads%2FSFN2EIb79iEpFH58LHrw%2Fimage.png?alt=media&amp;token=f1067390-4cc9-4ab2-8ec4-ee2b442a0393" alt=""><figcaption></figcaption></figure>

### **Step 7: Import a self-signed certificate on Windows 10 machine:** <a href="#id-4xaanmc2jx5v" id="id-4xaanmc2jx5v"></a>

Once you get a .cer certificate file, you need to import the certificate on the local computer. You need to store the certificate under the Trusted Root Certification Authorities store.

**28. Double-click on SSTP selfsigned.cer file.** Click on the **Install certificate.**

<figure><img src="https://2438328698-files.gitbook.io/~/files/v0/b/gitbook-x-prod.appspot.com/o/spaces%2FPf7CIJDZ869PqrsNNvPr%2Fuploads%2F01ce2U9NWN626Yoa6vOl%2Fimage.png?alt=media&amp;token=3e4b8a3e-54de-45f4-91c0-5396aa6c4a0d" alt=""><figcaption></figcaption></figure>

**29. Select Local Machine** and **click Next.**

<figure><img src="https://2438328698-files.gitbook.io/~/files/v0/b/gitbook-x-prod.appspot.com/o/spaces%2FPf7CIJDZ869PqrsNNvPr%2Fuploads%2FXEbJ1DjAnMjJStiqkUks%2Fimage.png?alt=media&amp;token=0948052c-ad9c-453c-b664-1ee807e444ba" alt=""><figcaption></figcaption></figure>

**30.** Select Place certificates in the following store radio button and **click on Browse.**

<figure><img src="https://2438328698-files.gitbook.io/~/files/v0/b/gitbook-x-prod.appspot.com/o/spaces%2FPf7CIJDZ869PqrsNNvPr%2Fuploads%2FmmtPJTH1UjEzmetq64BV%2Fimage.png?alt=media&amp;token=f14b5c61-c557-4d19-a584-145fdf696f19" alt=""><figcaption></figcaption></figure>

**31. Select the Trusted Root Certification Authorities** store and **click OK. Click Next.**

<figure><img src="https://2438328698-files.gitbook.io/~/files/v0/b/gitbook-x-prod.appspot.com/o/spaces%2FPf7CIJDZ869PqrsNNvPr%2Fuploads%2FCJDOlFs3FC33rE1UsoIU%2Fimage.png?alt=media&amp;token=3bed909f-6170-4bc8-b704-653fb09ef9ce" alt=""><figcaption></figcaption></figure>

**32. Click on Finish** to complete the import process.

<figure><img src="https://2438328698-files.gitbook.io/~/files/v0/b/gitbook-x-prod.appspot.com/o/spaces%2FPf7CIJDZ869PqrsNNvPr%2Fuploads%2FrCub2KGCzw3vAhaUQeWq%2Fimage.png?alt=media&amp;token=c677c9c1-73ea-48a2-88d6-07d53e912493" alt=""><figcaption></figcaption></figure>

### **Step 8: Test SSTP VPN configuration** <a href="#id-8jt06t4vi29e" id="id-8jt06t4vi29e"></a>

On Windows 10 client machine, we need to create a new VPN connection.

**33. Right-click on the Start button** and **select Network Connections.**

<figure><img src="https://2438328698-files.gitbook.io/~/files/v0/b/gitbook-x-prod.appspot.com/o/spaces%2FPf7CIJDZ869PqrsNNvPr%2Fuploads%2FSyKLj8knYPzyVSRjOVXU%2Fimage.png?alt=media&amp;token=1eb9132a-b9d8-42b9-88c0-d7dcca83846b" alt=""><figcaption></figcaption></figure>

**34.** On left-pane, **click on VPN and add a new VPN connection.**

<figure><img src="https://2438328698-files.gitbook.io/~/files/v0/b/gitbook-x-prod.appspot.com/o/spaces%2FPf7CIJDZ869PqrsNNvPr%2Fuploads%2F5SfxbqL5ODkJ9w5TNf9D%2Fimage.png?alt=media&amp;token=3f381c5f-7550-4f01-957f-51ee80f9b636" alt=""><figcaption></figcaption></figure>

**36. Specify the required information** for the VPN connection.

* **VPN Provider:** Windows (Built-in)
* **Connection Name:** Name of your choice
* **Server Name or IP Address:** FQDN of VPN server or Server Name
* **VPN Type:** SSTP (Secure Socket Tunneling Protocol)

**Click on Save.**

<figure><img src="https://2438328698-files.gitbook.io/~/files/v0/b/gitbook-x-prod.appspot.com/o/spaces%2FPf7CIJDZ869PqrsNNvPr%2Fuploads%2F5mtQY8tNPLYde7ed2akJ%2Fimage.png?alt=media&amp;token=5e270482-1f73-49a0-9efb-4339cb1f6514" alt=""><figcaption></figcaption></figure>

**37. Select VPN connection** and **click on Connect.**

<figure><img src="https://2438328698-files.gitbook.io/~/files/v0/b/gitbook-x-prod.appspot.com/o/spaces%2FPf7CIJDZ869PqrsNNvPr%2Fuploads%2FkYT1Nbgc6mOhWEKSTRfN%2Fimage.png?alt=media&amp;token=57bc9272-0ab6-4395-b069-d2cbf3e9e50e" alt=""><figcaption></figcaption></figure>

**38. Specify a username and password** to connect the VPN server. **Click OK** to connect.

<figure><img src="https://2438328698-files.gitbook.io/~/files/v0/b/gitbook-x-prod.appspot.com/o/spaces%2FPf7CIJDZ869PqrsNNvPr%2Fuploads%2FE0GqL1W5rE7XSHrUmk9O%2Fimage.png?alt=media&amp;token=d306562e-dd5b-42e4-b055-3dc75bfb5da6" alt=""><figcaption></figcaption></figure>

**39.** Verify the **VPN connection is successfully connected** with the VPN server using SSTP protocol. **Take a screenshot**

<figure><img src="https://2438328698-files.gitbook.io/~/files/v0/b/gitbook-x-prod.appspot.com/o/spaces%2FPf7CIJDZ869PqrsNNvPr%2Fuploads%2F7MAPdxQY1Uwa4VXhuFlA%2Fimage.png?alt=media&amp;token=6a945f29-597e-400f-9243-f45af82e8d9d" alt=""><figcaption></figcaption></figure>

### **On Windows 10 Client Machine**

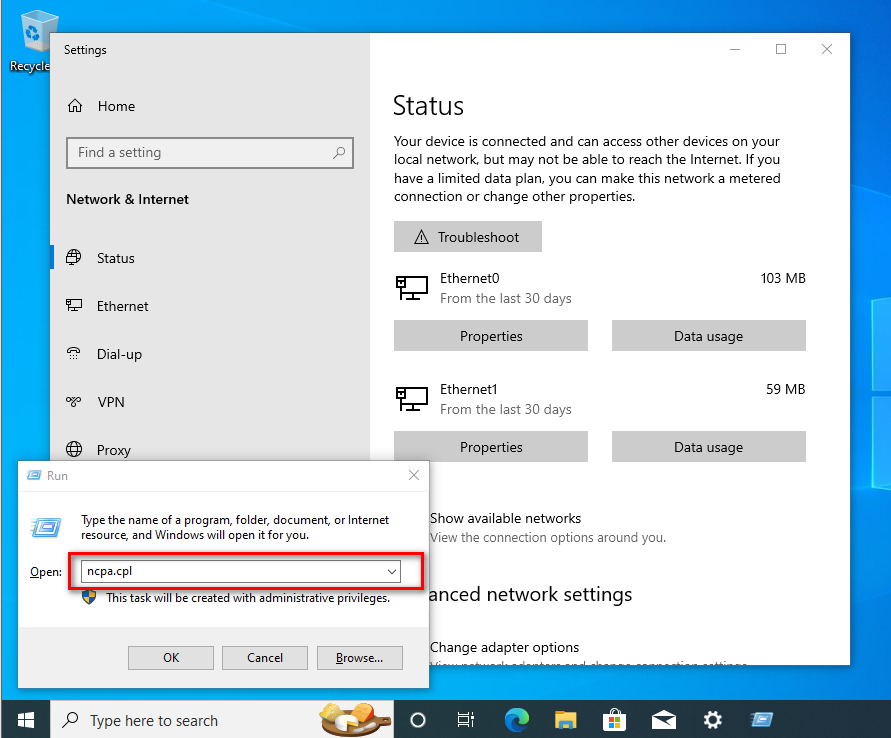
**40.** Press Windows Key and R key together. At Run menu type ncpa.cpl and press enter to **open Network Connection console.**

<figure><img src="https://2438328698-files.gitbook.io/~/files/v0/b/gitbook-x-prod.appspot.com/o/spaces%2FPf7CIJDZ869PqrsNNvPr%2Fuploads%2F99Md6eZC0Qja9MB9EbJI%2Fimage.png?alt=media&amp;token=4c627457-01c7-490b-9148-ce7c005b8d11" alt=""><figcaption></figcaption></figure>

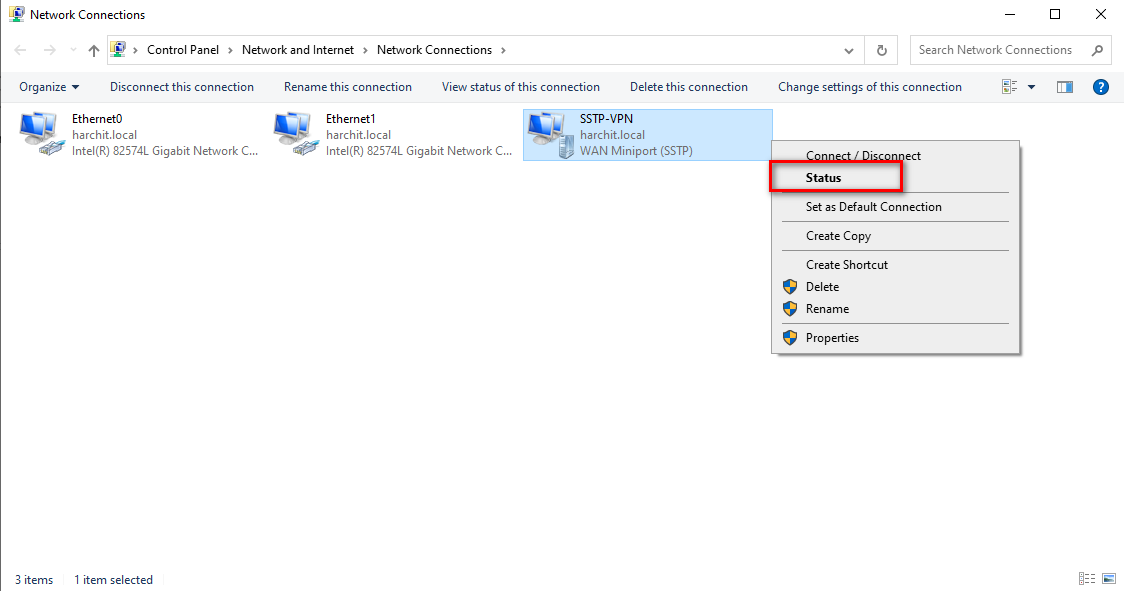
**41. Right-click on VPN connection** and **click on the Status button.**

<figure><img src="https://2438328698-files.gitbook.io/~/files/v0/b/gitbook-x-prod.appspot.com/o/spaces%2FPf7CIJDZ869PqrsNNvPr%2Fuploads%2F65ZEb4jPul0a4xvLhDeX%2Fimage.png?alt=media&amp;token=58d9c924-cf57-4fcd-87f1-acb5c42e94cd" alt=""><figcaption></figcaption></figure>

**42. Click on details** to see information about VPN connection like Authentication Method etc.

<figure><img src="https://2438328698-files.gitbook.io/~/files/v0/b/gitbook-x-prod.appspot.com/o/spaces%2FPf7CIJDZ869PqrsNNvPr%2Fuploads%2F7R9uDJCFWfiADrLau0sP%2Fimage.png?alt=media&amp;token=b8ff72ac-23ca-4f33-a10b-3cdc327e27d5" alt=""><figcaption></figcaption></figure>