> For the complete documentation index, see [llms.txt](https://talebi.gitbook.io/windows-server/llms.txt). Markdown versions of documentation pages are available by appending `.md` to page URLs; this page is available as [Markdown](https://talebi.gitbook.io/windows-server/active-directory.md).

# Active Directory

{% hint style="info" %}
<https://learn.microsoft.com/en-us/training/modules/introduction-to-ad-ds/>
{% endhint %}

<figure><img src="https://2438328698-files.gitbook.io/~/files/v0/b/gitbook-x-prod.appspot.com/o/spaces%2FPf7CIJDZ869PqrsNNvPr%2Fuploads%2F3DFKtNBl3lP1hGLO9CC7%2FAD%20(1).png?alt=media&amp;token=539e03e3-1199-453d-958d-27e5da35690d" alt=""><figcaption></figcaption></figure>

Active Directory (AD) is a directory service developed by Microsoft for Windows domain networks. It is a crucial component in a Windows-based network infrastructure and provides a centralized and standardized system for managing and organizing information about network resources, such as computers, users, groups, printers, and other devices.

{% hint style="warning" %}
In this scenario, we are going to install AD on the server and then join the client to AD.
{% endhint %}

## Lab Setup and Prerequisites:

It is important to ensure that the server's name is configured and a static IP address has been set onto the server before installing Active Directory. Failure to do so will cause issues later on.

* **Machine Name: WinServer**
* **IP Address: 192.168.10.1/24**
* **DNS Server Address: 127.0.0.1 or 192.168.10.1**

*Note: Since the server will also be the DNS server, we will setup our DNS Server's IP Address as 127.0.0.1 (or the same static IP Address we've used to identify the server which is 192.168.10.1).*

**Active Directory setup process is divided into two major parts:**

1. Install Active directory Domain Service
2. Promote server as Domain controller

Let’s walk through the methods of installing an active directory on Windows Server and adding domain in the new forest.

### Step-1: Install Active Directory Domain Services (ADDS) Role

1\. Login to your server using an administrator user account.

2\. Open the Server Manager dashboard.

<figure><img src="https://2438328698-files.gitbook.io/~/files/v0/b/gitbook-x-prod.appspot.com/o/spaces%2FPf7CIJDZ869PqrsNNvPr%2Fuploads%2F71Ora4sAw2aOADCY1hsi%2Fimage.png?alt=media&amp;token=21529360-03d0-49ee-97e7-4e9eca730593" alt=""><figcaption></figcaption></figure>

3\. Click on Tools and Select Add roles and features.

<figure><img src="https://2438328698-files.gitbook.io/~/files/v0/b/gitbook-x-prod.appspot.com/o/spaces%2FPf7CIJDZ869PqrsNNvPr%2Fuploads%2FDsbP9mZvoFM4SFYVB7Ex%2Fimage.png?alt=media&amp;token=0b7b4b5d-e556-4cb3-9a44-e271e5d360c0" alt=""><figcaption></figcaption></figure>

4. Click **Next** to proceed.

<figure><img src="https://2438328698-files.gitbook.io/~/files/v0/b/gitbook-x-prod.appspot.com/o/spaces%2FPf7CIJDZ869PqrsNNvPr%2Fuploads%2FExBx9cu3gREi0rSIiwe8%2Fimage.png?alt=media&amp;token=9d2b6b2a-f232-4a62-bec9-db85f66ea538" alt=""><figcaption></figcaption></figure>

5. Select **Role-based or feature-based installation** option and **click on Next.**

<figure><img src="https://2438328698-files.gitbook.io/~/files/v0/b/gitbook-x-prod.appspot.com/o/spaces%2FPf7CIJDZ869PqrsNNvPr%2Fuploads%2Fb6Bi2LxFSJrLr2PVkLVM%2Fimage.png?alt=media&amp;token=790e7a4b-fbde-4448-98ab-8a64280981b6" alt=""><figcaption></figcaption></figure>

6. Since I am installing Active Directory Domain Services (AD DS) role locally I will choose **“Select a server from the server pool”.** Choose the server on which you want to install AD DS server role , in my case its **WinServer**. Click on **Next.**

<figure><img src="https://2438328698-files.gitbook.io/~/files/v0/b/gitbook-x-prod.appspot.com/o/spaces%2FPf7CIJDZ869PqrsNNvPr%2Fuploads%2F0inJCQyg2bc36JOEYeEA%2Fimage.png?alt=media&amp;token=a58d655f-6ad2-41e3-a1a1-7c22319345a6" alt=""><figcaption></figcaption></figure>

7. Now **select the Active Directory Domain Services** role from the Server Roles page.

<figure><img src="https://2438328698-files.gitbook.io/~/files/v0/b/gitbook-x-prod.appspot.com/o/spaces%2FPf7CIJDZ869PqrsNNvPr%2Fuploads%2FTtG91pzAiYOBJ72DTQhB%2Fimage.png?alt=media&amp;token=0955202d-3ed7-47b7-8de0-5ecbadb72f06" alt=""><figcaption></figcaption></figure>

8\. Once you click on AD DS, another window will popup explaining the additional features that are required to install Active Directory Domain Services. Click on **Add Features.**

<figure><img src="https://2438328698-files.gitbook.io/~/files/v0/b/gitbook-x-prod.appspot.com/o/spaces%2FPf7CIJDZ869PqrsNNvPr%2Fuploads%2FogfVYw0lenb3CPBownKf%2Fimage.png?alt=media&amp;token=f697a6d9-c8b3-4ae2-90da-6b310ab2be40" alt=""><figcaption></figcaption></figure>

9. Now select **DNS server role** and **click on add features** to add required additional features. **Click on Next.**

<figure><img src="https://2438328698-files.gitbook.io/~/files/v0/b/gitbook-x-prod.appspot.com/o/spaces%2FPf7CIJDZ869PqrsNNvPr%2Fuploads%2FMnlIXwS1GBAdsXCpWJSm%2Fimage.png?alt=media&amp;token=2cde42ba-f012-47cd-b57b-958d649ed2d5" alt=""><figcaption></figcaption></figure>

<figure><img src="https://2438328698-files.gitbook.io/~/files/v0/b/gitbook-x-prod.appspot.com/o/spaces%2FPf7CIJDZ869PqrsNNvPr%2Fuploads%2FuxW9GOvLQQ4dCZC2OwCP%2Fimage.png?alt=media&amp;token=5e187329-d2c0-4e4b-9a0b-3119568c869a" alt=""><figcaption></figcaption></figure>

10. Click Next on Select Features console

<figure><img src="https://2438328698-files.gitbook.io/~/files/v0/b/gitbook-x-prod.appspot.com/o/spaces%2FPf7CIJDZ869PqrsNNvPr%2Fuploads%2Fkn7Trm06Js2QMHx3B0dw%2Fimage.png?alt=media&amp;token=d7a44c5f-940b-4fa6-9445-50d934148320" alt=""><figcaption></figcaption></figure>

11. On Active Directory Domain Services page, review the information about AD DS. **Click on Next.**

<figure><img src="https://2438328698-files.gitbook.io/~/files/v0/b/gitbook-x-prod.appspot.com/o/spaces%2FPf7CIJDZ869PqrsNNvPr%2Fuploads%2FARBpfZuss7cMjFWzJaH3%2Fimage.png?alt=media&amp;token=988bb831-5bb7-4218-ace4-495deab3706f" alt=""><figcaption></figcaption></figure>

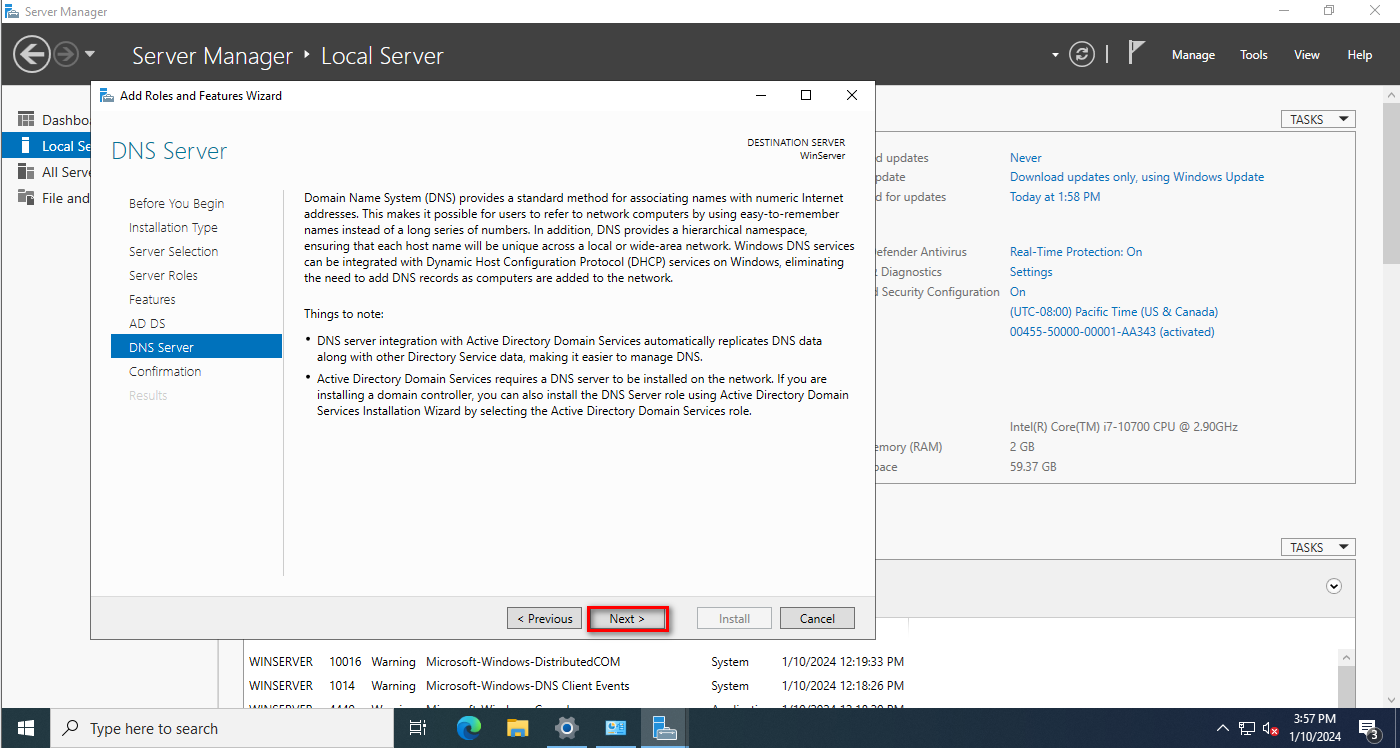
12. On DNS page, review the information about DNS server role. Click on Next.

<figure><img src="https://2438328698-files.gitbook.io/~/files/v0/b/gitbook-x-prod.appspot.com/o/spaces%2FPf7CIJDZ869PqrsNNvPr%2Fuploads%2FBKuLs4CHjSDAaUQR2f5B%2Fimage.png?alt=media&amp;token=63b234c2-84b5-40a7-9cb5-3ff7ecfff62d" alt=""><figcaption></figcaption></figure>

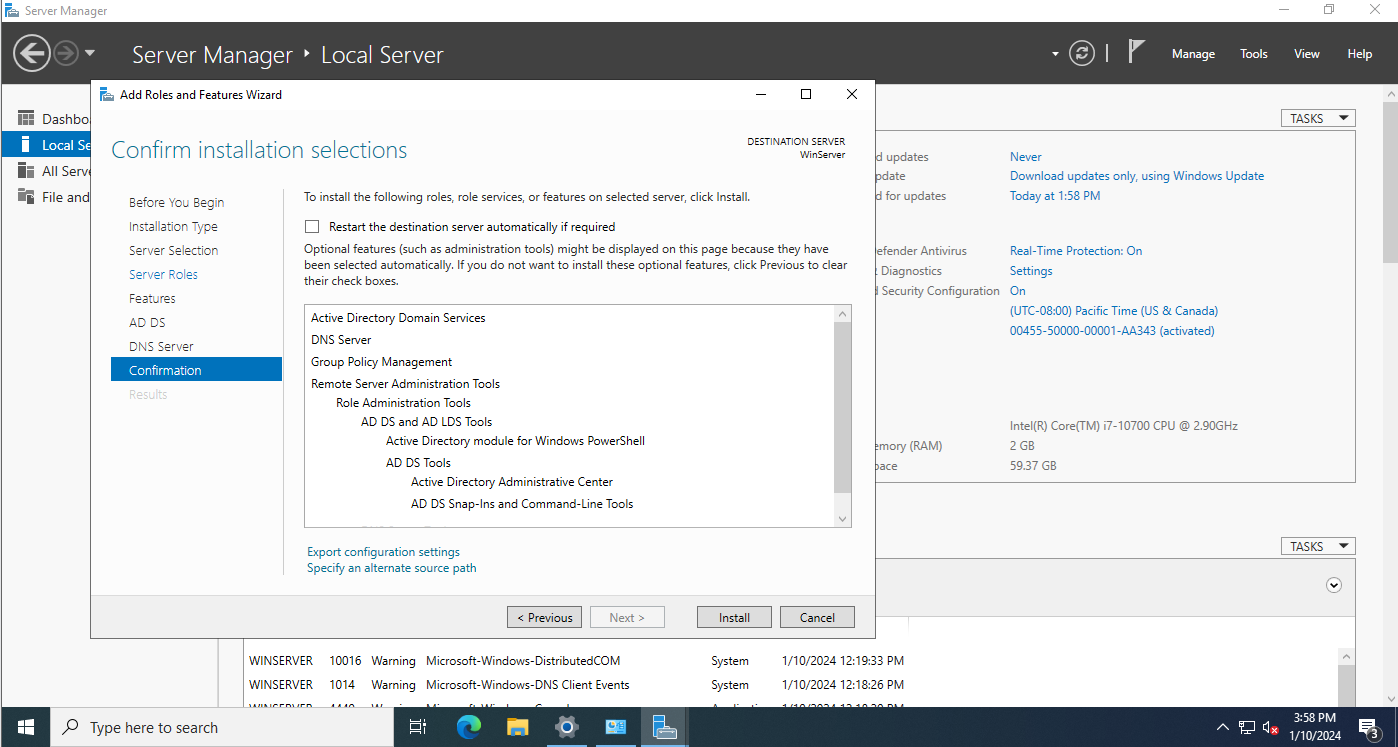
13. Click on **Install** to start the installation process.

<figure><img src="https://2438328698-files.gitbook.io/~/files/v0/b/gitbook-x-prod.appspot.com/o/spaces%2FPf7CIJDZ869PqrsNNvPr%2Fuploads%2FYvzCOmL8xVAysX0AYxL7%2Fimage.png?alt=media&amp;token=57d4a69c-2703-4895-b143-e4e34d8eb61a" alt=""><figcaption></figcaption></figure>

The installation process will take some time to complete.

### Step-2: Promote Windows Server as Domain Controller:

1. After installing Active directory services, click on **Promote server to a domain controller** link.

<figure><img src="https://2438328698-files.gitbook.io/~/files/v0/b/gitbook-x-prod.appspot.com/o/spaces%2FPf7CIJDZ869PqrsNNvPr%2Fuploads%2FhpXsn5kH7Z1v9WuzlqKl%2Fimage.png?alt=media&amp;token=590f4d66-3d4e-479f-bd65-a98117b58c4d" alt=""><figcaption></figcaption></figure>

2. Select Deployment option as per your requirement. Here I am installing the first Active directory in my network so I am selecting **Add a New Forest.**

<figure><img src="https://2438328698-files.gitbook.io/~/files/v0/b/gitbook-x-prod.appspot.com/o/spaces%2FPf7CIJDZ869PqrsNNvPr%2Fuploads%2FmwjiafKwaMuhiBoKLwzf%2Fimage.png?alt=media&amp;token=a06b8d12-7ebb-4c16-9180-aa45a3e5cb9e" alt=""><figcaption></figcaption></figure>

Now **specify your root domain name** into the Root domain name field. Here I have used **harchit.local.**

3. Select **forest and domain functional level**. I will be setting the functional level to the highest level available which is **Windows Server 2016** at the time of this writing.  You’ll also need **set up DSRM password** here. **Click on Next**.

<figure><img src="https://2438328698-files.gitbook.io/~/files/v0/b/gitbook-x-prod.appspot.com/o/spaces%2FPf7CIJDZ869PqrsNNvPr%2Fuploads%2Fk3fPmn0nV8XhoWxvwHJY%2Fimage.png?alt=media&amp;token=5ee6829b-553d-4818-a5fa-1cc29d1b1a2b" alt=""><figcaption></figcaption></figure>

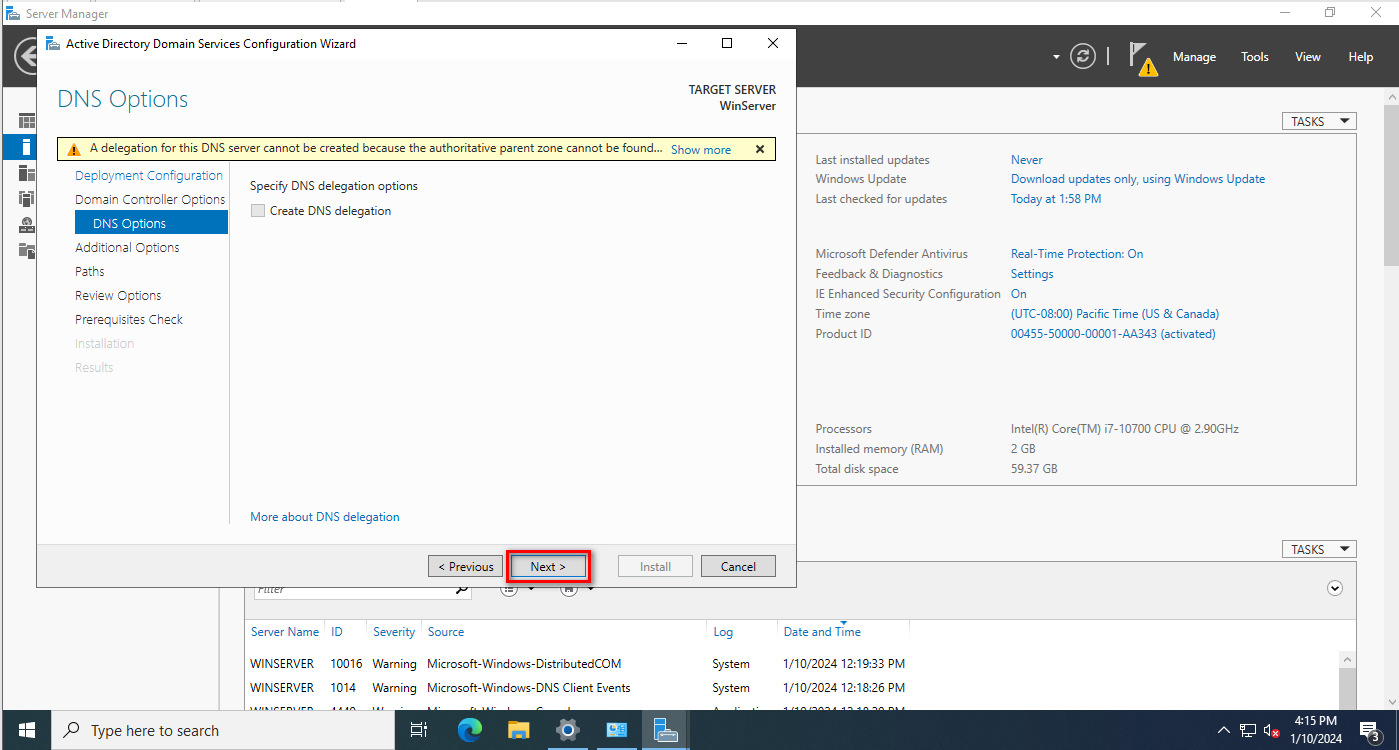
4. The next window it will give a warning about DNS delegation but it can be ignored. **Click Next** to continue.

<figure><img src="https://2438328698-files.gitbook.io/~/files/v0/b/gitbook-x-prod.appspot.com/o/spaces%2FPf7CIJDZ869PqrsNNvPr%2Fuploads%2FVN7HZVnYwWsqfCi7UFyg%2Fimage.png?alt=media&amp;token=1a412684-17b6-4c8a-9c9f-41bdb3291c5d" alt=""><figcaption></figcaption></figure>

5. The next window asks for the **NetBIOS name** for the Domain. We can keep it default and **click on Next** to continue.

<figure><img src="https://2438328698-files.gitbook.io/~/files/v0/b/gitbook-x-prod.appspot.com/o/spaces%2FPf7CIJDZ869PqrsNNvPr%2Fuploads%2F6dI7I2MoQ4AC92U5yjlZ%2Fimage.png?alt=media&amp;token=5a239629-3b0c-4c54-a624-5c63b1623c5d" alt=""><figcaption></figcaption></figure>

6. The next window it gives us **option to change file paths for AD database, log files and SYSVOL files.** We can change the paths or keep them defaults. Once changes are done **click on Next** to continue.

<figure><img src="https://2438328698-files.gitbook.io/~/files/v0/b/gitbook-x-prod.appspot.com/o/spaces%2FPf7CIJDZ869PqrsNNvPr%2Fuploads%2FQdSiSI3f7b9hecpfqE0A%2Fimage.png?alt=media&amp;token=5c3f9c8d-0e0d-403f-9b84-0524c919b219" alt=""><figcaption></figcaption></figure>

7. The **Review Options** page will show you the summary of the configuration options you chose. Take your time in checking this then **Click Next** to continue.

<figure><img src="https://2438328698-files.gitbook.io/~/files/v0/b/gitbook-x-prod.appspot.com/o/spaces%2FPf7CIJDZ869PqrsNNvPr%2Fuploads%2FsAns0vBOA04ZOLAjAsi4%2Fimage.png?alt=media&amp;token=b95420b3-e07f-4a7e-8efd-cac1d1a4748d" alt=""><figcaption></figcaption></figure>

8. A prerequisite check will be done to see if the configuration made is compatible with the system and its environment. If it shows any critical errors, those issues will need to be addressed before the installation begins. Once the test completes successfully **click the Install button to begin.**

<figure><img src="https://2438328698-files.gitbook.io/~/files/v0/b/gitbook-x-prod.appspot.com/o/spaces%2FPf7CIJDZ869PqrsNNvPr%2Fuploads%2FzIjr9li7aXT952TeqNJP%2Fimage.png?alt=media&amp;token=2266ba27-f03c-4900-936c-89e3dd46597c" alt=""><figcaption></figcaption></figure>

9. The installation process will take a few minutes but once it’s complete, it will automatically reboot the server.

#### **Verifying the New Active Directory Domain**

1. Once the server has rebooted, log into server using the domain administrator credential&#x73;**.**

<figure><img src="https://2438328698-files.gitbook.io/~/files/v0/b/gitbook-x-prod.appspot.com/o/spaces%2FPf7CIJDZ869PqrsNNvPr%2Fuploads%2FexnZJGzkm1jH2gMqJWXj%2Fimage.png?alt=media&amp;token=b5a37ef2-0d1c-4a23-b2cd-b16a2bbb3c75" alt=""><figcaption></figcaption></figure>

2. You will be able to view the installed services using the Service Manager's Dashboard and the picture below shows that we have AD DS and DNS Services running.

<figure><img src="https://2438328698-files.gitbook.io/~/files/v0/b/gitbook-x-prod.appspot.com/o/spaces%2FPf7CIJDZ869PqrsNNvPr%2Fuploads%2FLG7J7pTCemFcEi3YWPvx%2Fimage.png?alt=media&amp;token=534440d5-08b0-4002-b674-ca71c47510c5" alt=""><figcaption></figcaption></figure>

#### **Creating a Domain User**

1. Open Active Directory Users and Computers by clicking on Tools.

<figure><img src="https://2438328698-files.gitbook.io/~/files/v0/b/gitbook-x-prod.appspot.com/o/spaces%2FPf7CIJDZ869PqrsNNvPr%2Fuploads%2FuPsnoahIjH4VvGiz1pne%2Fimage.png?alt=media&amp;token=873fa099-c248-4c76-b29f-882bcdd19b9c" alt=""><figcaption></figcaption></figure>

2. &#x20;Create a user with your name in Active Directory users. Right click Users, select 'New' and then 'Users'

<figure><img src="https://2438328698-files.gitbook.io/~/files/v0/b/gitbook-x-prod.appspot.com/o/spaces%2FPf7CIJDZ869PqrsNNvPr%2Fuploads%2Fo3csCZW1Q4JUbrM2A4EY%2Fimage.png?alt=media&amp;token=90d7d5ab-819a-4aca-8c44-b7ee3c22ef44" alt=""><figcaption></figcaption></figure>

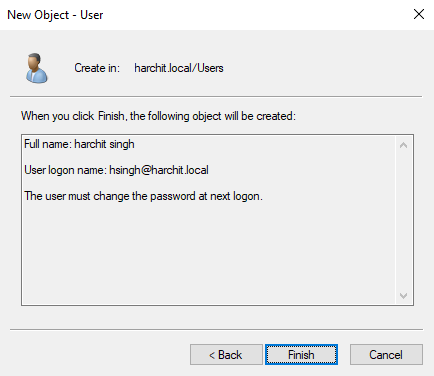
3. Fill in your user details and create a **user logon name** which you will be using whenever you will be logging in to the domain. Click **'Next'**

<figure><img src="https://2438328698-files.gitbook.io/~/files/v0/b/gitbook-x-prod.appspot.com/o/spaces%2FPf7CIJDZ869PqrsNNvPr%2Fuploads%2FtyiC0vGahtQEpV0Gvgue%2Fimage.png?alt=media&amp;token=ecfc8b48-5f81-4e38-ba11-af4bdf1e3c85" alt=""><figcaption></figcaption></figure>

4. &#x20;Configure the password and  password setting as per your requirements

<figure><img src="https://2438328698-files.gitbook.io/~/files/v0/b/gitbook-x-prod.appspot.com/o/spaces%2FPf7CIJDZ869PqrsNNvPr%2Fuploads%2FiChr2PQItx1LkDSFss48%2Fspaces_Pf7CIJDZ869PqrsNNvPr_uploads_lFV5sJ0TEr5faYbJahJL_image.webp?alt=media&amp;token=1900b7f8-1bdc-4294-8b3c-316565e68ab1" alt=""><figcaption></figcaption></figure>

4. Click **'Finish'**

<figure><img src="https://2438328698-files.gitbook.io/~/files/v0/b/gitbook-x-prod.appspot.com/o/spaces%2FPf7CIJDZ869PqrsNNvPr%2Fuploads%2FHpWILv2pzKg6lWwUn4IC%2Fimage.png?alt=media&amp;token=0ba6717b-c565-4dee-a381-4c25d267c0d2" alt=""><figcaption></figcaption></figure>

### **Step-3: Joining a Client PC to our New Domain**

We have a Windows 10 client PC installed within the 192.168.10.0/24 network which we will be joining to our newly created domain.

Joining a client PC to your new domain will require you to have the following:

* The host should be able to reach the Domain Controller
* The local host's and /or domain administrator username and password

1. On the host machine go to Settings

<figure><img src="https://2438328698-files.gitbook.io/~/files/v0/b/gitbook-x-prod.appspot.com/o/spaces%2FPf7CIJDZ869PqrsNNvPr%2Fuploads%2FLrfwlqBRo2IeGiRwwq0r%2Fimage.png?alt=media&amp;token=3d15d5a4-7d80-44db-88f1-4bc51cf52eed" alt=""><figcaption></figcaption></figure>

2. Click on System

<figure><img src="https://2438328698-files.gitbook.io/~/files/v0/b/gitbook-x-prod.appspot.com/o/spaces%2FPf7CIJDZ869PqrsNNvPr%2Fuploads%2FjBA4vpye1wQo7CyjZmUC%2Fimage.png?alt=media&amp;token=905829a4-1e5e-4438-a02d-fe84865d3b9f" alt=""><figcaption></figcaption></figure>

3. On the left pane will show us a column containing system settings, scroll down and select **About**.

<figure><img src="https://2438328698-files.gitbook.io/~/files/v0/b/gitbook-x-prod.appspot.com/o/spaces%2FPf7CIJDZ869PqrsNNvPr%2Fuploads%2F1prwz37ub4oN7wRm00mx%2Fimage.png?alt=media&amp;token=1d677f98-ae42-4f1d-8ca5-64d6ffd5b140" alt=""><figcaption></figcaption></figure>

3. The right pane will show us information about the host machine along with other options that we can configure. Scroll down from the right pane until you find Advanced System Settings.

<figure><img src="https://2438328698-files.gitbook.io/~/files/v0/b/gitbook-x-prod.appspot.com/o/spaces%2FPf7CIJDZ869PqrsNNvPr%2Fuploads%2FMyViH7Flssg5N41CqobD%2Fimage.png?alt=media&amp;token=687b2827-6f95-4a6e-8403-1e962a9e2e10" alt=""><figcaption></figcaption></figure>

4. After clicking Advanced system settings, the System Properties will pop-up. Simply navigate to the Computer Name tab.&#x20;
5. Select **Change** to open the **Computer Name/Domain Changes window**.&#x20;
6. In the Computer Name/Domain Changes window, enter the Computer name for your host machine and the domain you wish for the machine to join.

<figure><img src="https://2438328698-files.gitbook.io/~/files/v0/b/gitbook-x-prod.appspot.com/o/spaces%2FPf7CIJDZ869PqrsNNvPr%2Fuploads%2FkcROSEciyWuwOd4T3DWL%2Fimage.png?alt=media&amp;token=75543951-3316-46e4-bdc8-cb1930fbbdc7" alt=""><figcaption></figcaption></figure>

7. The dialog box to enter the credentials for the domain account will open. Use the '**username\@domainname'** to log in. **For example**- <administrator@harchit.local>.

   *Note: This will require you to enter a domain administrator account or the host machine's local administrator account.*

<figure><img src="https://2438328698-files.gitbook.io/~/files/v0/b/gitbook-x-prod.appspot.com/o/spaces%2FPf7CIJDZ869PqrsNNvPr%2Fuploads%2FOyjV62xzXN78Z934mVTg%2Fimage.png?alt=media&amp;token=e9bc8b53-f40d-4af9-aea2-9a73e809ba6a" alt=""><figcaption></figcaption></figure>

8. Login into windows 10 with the user you have created in the previous step.

<figure><img src="https://2438328698-files.gitbook.io/~/files/v0/b/gitbook-x-prod.appspot.com/o/spaces%2FPf7CIJDZ869PqrsNNvPr%2Fuploads%2FW5gi4sNPwZhJLkPQ9wHl%2Fimage.png?alt=media&amp;token=0381b54e-ae4b-4a31-97df-d87bf649e34d" alt=""><figcaption></figcaption></figure>