> For the complete documentation index, see [llms.txt](https://talebi.gitbook.io/windows-server/llms.txt). Markdown versions of documentation pages are available by appending `.md` to page URLs; this page is available as [Markdown](https://talebi.gitbook.io/windows-server/nfs-samba/nfs-server.md).

# NFS Server

### **What is the Network File System (NFS)?** <a href="#xt0inuu0ksl6" id="xt0inuu0ksl6"></a>

Network File System (NFS) provides a file-sharing solution that lets you transfer files between computers running Windows Server and other non-Windows operating systems such as Linux or UNIX using the NFS protocol.

NFS in Windows Server includes Server for NFS and Client for NFS. A computer running Windows Server can use Server for NFS to act as an NFS file server for other non-Windows client computers.

Client for NFS allows a Windows-based computer running Windows Server to access files stored on a non-Windows NFS server.

You should replace all of these screenshots with your own screenshots and then submit your doc file.

### **Understanding Test lab** <a href="#boa5q6jm2zpc" id="boa5q6jm2zpc"></a>

<figure><img src="https://2438328698-files.gitbook.io/~/files/v0/b/gitbook-x-prod.appspot.com/o/spaces%2FPf7CIJDZ869PqrsNNvPr%2Fuploads%2FVtIyqFEi5fAy9eY1mhj6%2FAD%20(1).png?alt=media&amp;token=f27b572b-8e13-437c-ab73-14833b0a6858" alt=""><figcaption></figcaption></figure>

* **Windows Server:** Domain Controller and DNS
* **OS Client:** Ubuntu OS, NFS client.

### **Install Server for NFS role service in Windows Server:** <a href="#id-1sxq8su8s7aa" id="id-1sxq8su8s7aa"></a>

To install the Server for NFS role service in Windows Server, follow the below steps:

**1.** **Open Server Manager**. **Click on Tools** and **select Add Role and Features.**

<figure><img src="https://2438328698-files.gitbook.io/~/files/v0/b/gitbook-x-prod.appspot.com/o/spaces%2FPf7CIJDZ869PqrsNNvPr%2Fuploads%2Fn6ivsSMJrVkmi4VGq71X%2Fimage.png?alt=media&amp;token=4bee4f67-5be1-485d-8d52-264a4162646e" alt=""><figcaption></figcaption></figure>

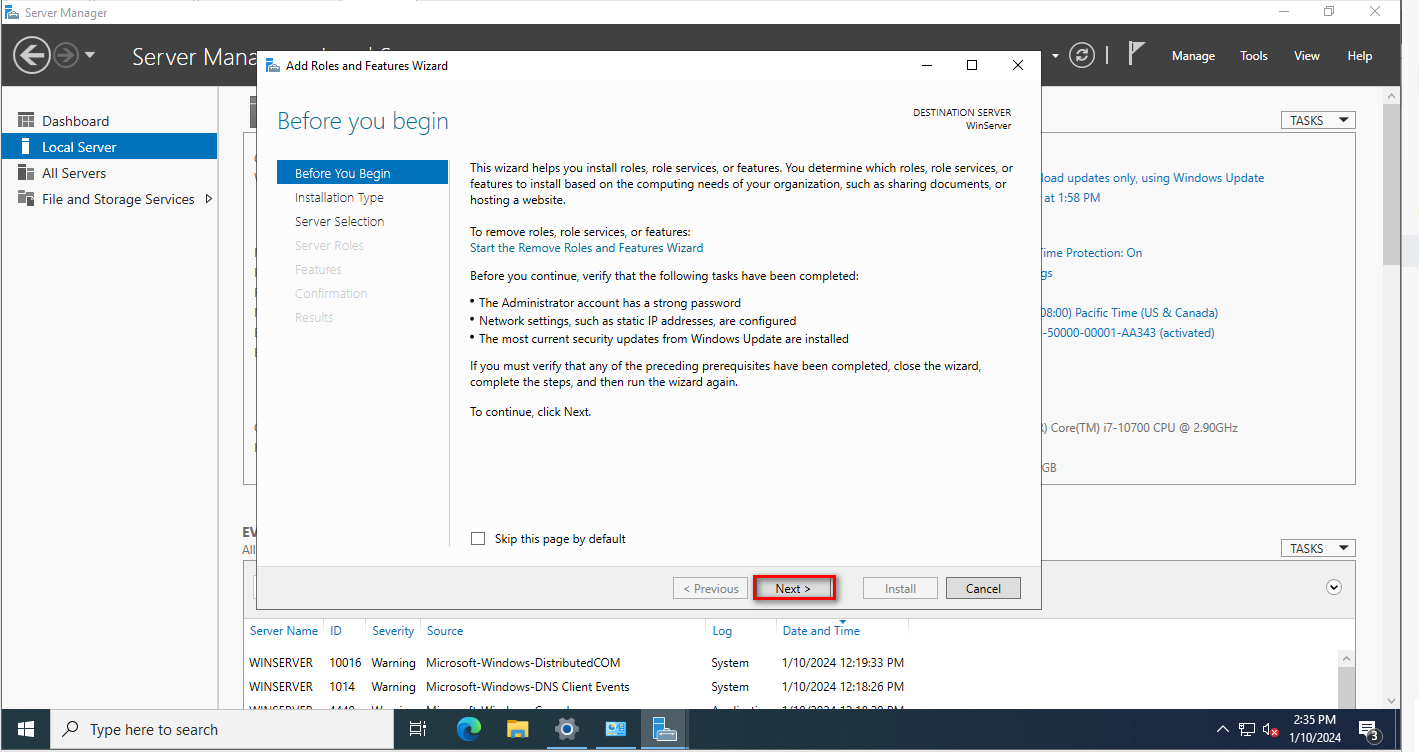
**2.** On the Before you begin page, **click Next.**

<figure><img src="https://2438328698-files.gitbook.io/~/files/v0/b/gitbook-x-prod.appspot.com/o/spaces%2FPf7CIJDZ869PqrsNNvPr%2Fuploads%2FdVeR0tnBj7GZT93F9OP4%2Fimage.png?alt=media&amp;token=2f1d3d48-25e5-471f-a652-69af1d5c51d3" alt=""><figcaption></figcaption></figure>

**3.** **Select Role-based or feature-based installation** and **click Next.**

<figure><img src="https://2438328698-files.gitbook.io/~/files/v0/b/gitbook-x-prod.appspot.com/o/spaces%2FPf7CIJDZ869PqrsNNvPr%2Fuploads%2FYncDd8oRHvGqPbx3AmWB%2Fimage.png?alt=media&amp;token=fec49dbc-bb9e-4725-a277-58d4d608bb7d" alt=""><figcaption></figcaption></figure>

**4. Select a server** from the server pool on which you want to install the Network File System for Server role service, **click Next.**

<figure><img src="https://2438328698-files.gitbook.io/~/files/v0/b/gitbook-x-prod.appspot.com/o/spaces%2FPf7CIJDZ869PqrsNNvPr%2Fuploads%2FOP9MiNv0ZBZIOXr0q7uP%2Fimage.png?alt=media&amp;token=a97eba2e-7aaf-49af-82ac-70a6a2d51173" alt=""><figcaption></figcaption></figure>

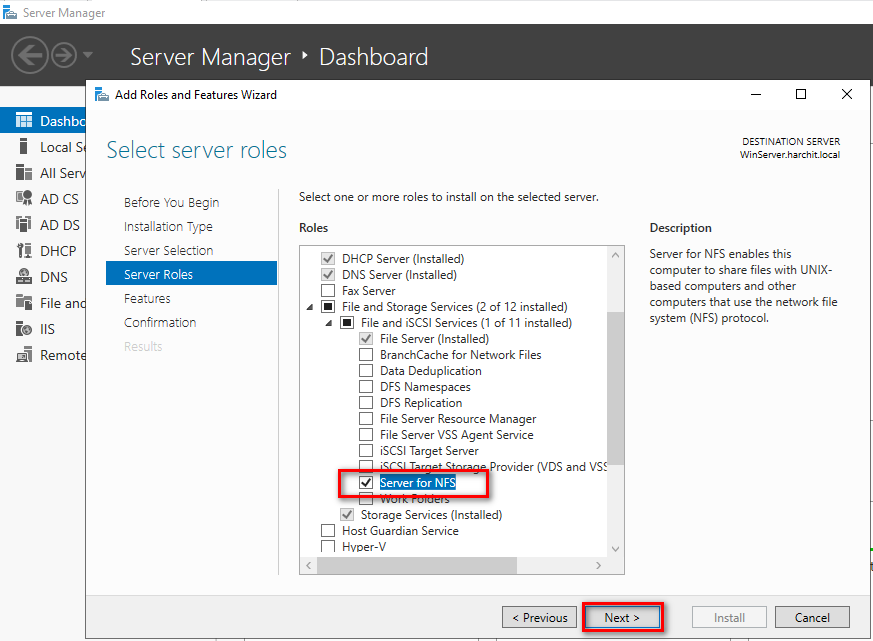
**5.** On select server roles page, expand **File and Storage Services**, expand **File and iSCSI Services**. **Select Server for NFS checkbox.**

<figure><img src="https://2438328698-files.gitbook.io/~/files/v0/b/gitbook-x-prod.appspot.com/o/spaces%2FPf7CIJDZ869PqrsNNvPr%2Fuploads%2FZBihGoGmb0wNpPvwiloo%2Fimage.png?alt=media&amp;token=cb3f6153-2936-4c66-9899-3ed1ea33ef97" alt=""><figcaption></figcaption></figure>

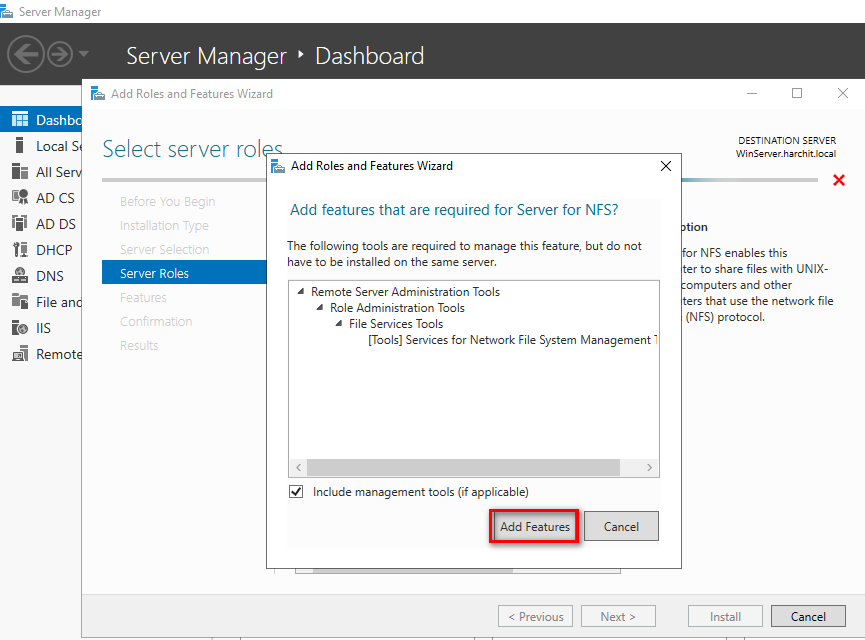
**6.** A new window will pop up, **click on Add Features** to include required features and management tools needed by the NFS server.

<figure><img src="https://2438328698-files.gitbook.io/~/files/v0/b/gitbook-x-prod.appspot.com/o/spaces%2FPf7CIJDZ869PqrsNNvPr%2Fuploads%2FH3ouXKNFDBOd7F0VTHFY%2Fimage.png?alt=media&amp;token=872de84e-fc9a-4fe3-9557-8b251c850fbe" alt=""><figcaption></figcaption></figure>

**7.** Make sure that the Server for NFS role service is selected. **Click Next.**

<figure><img src="https://2438328698-files.gitbook.io/~/files/v0/b/gitbook-x-prod.appspot.com/o/spaces%2FPf7CIJDZ869PqrsNNvPr%2Fuploads%2Fk8EG2Wbktjf9dmpglHcb%2Fimage.png?alt=media&amp;token=52e5fcb2-2773-46c2-b557-0935ef28d020" alt=""><figcaption></figcaption></figure>

**8.** On select features, **click Next.**

<figure><img src="https://2438328698-files.gitbook.io/~/files/v0/b/gitbook-x-prod.appspot.com/o/spaces%2FPf7CIJDZ869PqrsNNvPr%2Fuploads%2FXAE63NdQRzrwTWWlshZG%2Fimage.png?alt=media&amp;token=900dfad0-5a27-4a5d-90c9-95e45cbf9a0d" alt=""><figcaption></figcaption></figure>

**9. Click Install** and complete the installation process.

<figure><img src="https://2438328698-files.gitbook.io/~/files/v0/b/gitbook-x-prod.appspot.com/o/spaces%2FPf7CIJDZ869PqrsNNvPr%2Fuploads%2FN6QyNNQGkDw8ggJo5XI8%2Fimage.png?alt=media&amp;token=1b00f62c-a477-447d-af09-a5f9a03b4df0" alt=""><figcaption></figcaption></figure>

**10. Click Close** to finish the installation.

<figure><img src="https://2438328698-files.gitbook.io/~/files/v0/b/gitbook-x-prod.appspot.com/o/spaces%2FPf7CIJDZ869PqrsNNvPr%2Fuploads%2FI0e8VQpechdtgbiSFz3N%2Fimage.png?alt=media&amp;token=847e890b-f13b-424b-af88-268ccb96fb54" alt=""><figcaption></figcaption></figure>

### **How to Create an NFS Shared Folder on Server:** <a href="#id-8wfriyzgowfq" id="id-8wfriyzgowfq"></a>

After installing the Server for NFS on Windows Server, the next step is to create an NFS shared folder by using the File and Storage Services console.

**11.** On the Server Manager Console, **click on File and Storage Services.**

<figure><img src="https://2438328698-files.gitbook.io/~/files/v0/b/gitbook-x-prod.appspot.com/o/spaces%2FPf7CIJDZ869PqrsNNvPr%2Fuploads%2FKLvrpVBNvtgbPN6kCiNh%2Fimage.png?alt=media&amp;token=4a4e3042-58e8-4ff2-ac71-e2e720829934" alt=""><figcaption></figcaption></figure>

**12.** **Click on Shares.** Right-click in the empty area and **select New Share.**

<figure><img src="https://2438328698-files.gitbook.io/~/files/v0/b/gitbook-x-prod.appspot.com/o/spaces%2FPf7CIJDZ869PqrsNNvPr%2Fuploads%2FSsvX6dwkLqP1zdtf6pMD%2Fimage.png?alt=media&amp;token=becc9015-21ce-4221-b562-2f3c9cf41ca6" alt=""><figcaption></figcaption></figure>

**13.** On Select the profile for this share, **select NFS Share – Quick profile. Click Next.**

<figure><img src="https://2438328698-files.gitbook.io/~/files/v0/b/gitbook-x-prod.appspot.com/o/spaces%2FPf7CIJDZ869PqrsNNvPr%2Fuploads%2FyrSpwH1bkJ1SW6MmqDP8%2Fimage.png?alt=media&amp;token=6d0b28f6-4311-4763-8c55-62d70e40ce8d" alt=""><figcaption></figcaption></figure>

<figure><img src="https://2438328698-files.gitbook.io/~/files/v0/b/gitbook-x-prod.appspot.com/o/spaces%2FPf7CIJDZ869PqrsNNvPr%2Fuploads%2FxOOAi0VT8JGQtmDUW1pz%2Fimage.png?alt=media&amp;token=ce44403d-002a-4e20-b744-73686e77a2df" alt=""><figcaption></figcaption></figure>

**14.** To configure a specific folder as NFS shared folder, **select the checkbox Type a custom path** and type the path for the specific folder you’d like to set as a shared folder. Click **Next.**

<figure><img src="https://2438328698-files.gitbook.io/~/files/v0/b/gitbook-x-prod.appspot.com/o/spaces%2FPf7CIJDZ869PqrsNNvPr%2Fuploads%2F0puZcC7RfWddFzZQdt92%2Fimage.png?alt=media&amp;token=0fc3feed-510d-4bae-8c0b-5307afff3af1" alt=""><figcaption></figcaption></figure>

**15.** Verify share name, local path and remote path for NFS shared folder. **Click Next.**

<figure><img src="https://2438328698-files.gitbook.io/~/files/v0/b/gitbook-x-prod.appspot.com/o/spaces%2FPf7CIJDZ869PqrsNNvPr%2Fuploads%2FV25gXrkDWNimIa84kXQ7%2Fimage.png?alt=media&amp;token=12deaec4-9c0b-4c2f-877d-dacca49fc9fc" alt=""><figcaption></figcaption></figure>

**16. Specify the Authentication methods** as per your requirement.

<figure><img src="https://2438328698-files.gitbook.io/~/files/v0/b/gitbook-x-prod.appspot.com/o/spaces%2FPf7CIJDZ869PqrsNNvPr%2Fuploads%2FAFAkqMpdalfRk3k2alEM%2Fimage.png?alt=media&amp;token=23981de7-c86d-44b0-a0fe-203f246d6976" alt=""><figcaption></figcaption></figure>

**17.** To set up the NFS share permissions, **click Add button.**

<figure><img src="https://2438328698-files.gitbook.io/~/files/v0/b/gitbook-x-prod.appspot.com/o/spaces%2FPf7CIJDZ869PqrsNNvPr%2Fuploads%2F3tbMfuM1T3vFbRv9VPnA%2Fimage.png?alt=media&amp;token=35460125-1f53-4246-b032-44d63ddaaf8e" alt=""><figcaption></figcaption></figure>

**18.** Specify the Hosts you’d like and assign the access permissions from the drop-down menu.

* **Host:** 192.168.10.21 (IP address of Ubuntu VM or Windows 10)
* **Share Permissions:** Read/Write

**19. Click on Add.**

<figure><img src="https://2438328698-files.gitbook.io/~/files/v0/b/gitbook-x-prod.appspot.com/o/spaces%2FPf7CIJDZ869PqrsNNvPr%2Fuploads%2FuGsibV1rtuVinh7RhPLy%2Fimage.png?alt=media&amp;token=0ed988a6-8afe-4786-b934-4804d1ed2781" alt=""><figcaption></figcaption></figure>

**20.** Using the same steps, you can add permission for other Hosts as well. **Click Next.**

<figure><img src="https://2438328698-files.gitbook.io/~/files/v0/b/gitbook-x-prod.appspot.com/o/spaces%2FPf7CIJDZ869PqrsNNvPr%2Fuploads%2FmxsNWlg50CCJVFBGTGm1%2Fimage.png?alt=media&amp;token=b52d4d66-829b-427f-89d4-92484bfeb306" alt=""><figcaption></figcaption></figure>

**21.** Specify NTFS permission. As we are just testing NFS sharing, we are going with default permission. **Click Next.**

<figure><img src="https://2438328698-files.gitbook.io/~/files/v0/b/gitbook-x-prod.appspot.com/o/spaces%2FPf7CIJDZ869PqrsNNvPr%2Fuploads%2FCwJfoCE8rSvyyEURBb5I%2Fimage.png?alt=media&amp;token=ca848935-4aca-4e7e-9c7f-a278fc7cd5cc" alt=""><figcaption></figcaption></figure>

**22.** Review the selections, **click on the Create button.**

<figure><img src="https://2438328698-files.gitbook.io/~/files/v0/b/gitbook-x-prod.appspot.com/o/spaces%2FPf7CIJDZ869PqrsNNvPr%2Fuploads%2FoLVGkYtI22DnPz0imh26%2Fimage.png?alt=media&amp;token=5823eb57-a936-40b0-8643-c4afb48142bd" alt=""><figcaption></figcaption></figure>

**23. Click on the close** button after verifying the successful creation of the NFS shared folder.

<figure><img src="https://2438328698-files.gitbook.io/~/files/v0/b/gitbook-x-prod.appspot.com/o/spaces%2FPf7CIJDZ869PqrsNNvPr%2Fuploads%2FldbqTecTXs2tIz4FLlAj%2Fimage.png?alt=media&amp;token=11ee344d-d826-4688-b9ff-bd10bceb1ba0" alt=""><figcaption></figcaption></figure>

**24.** Verify the NFS shared folder under the shares list. Access the local path of the NFS shared folder. **Create one text file and put some text under it.**

<figure><img src="https://2438328698-files.gitbook.io/~/files/v0/b/gitbook-x-prod.appspot.com/o/spaces%2FPf7CIJDZ869PqrsNNvPr%2Fuploads%2FEgYpbgOj7tkiSVQxOke8%2Fimage.png?alt=media&amp;token=78e8473e-8aee-47df-89db-adc3983aa5a8" alt=""><figcaption></figcaption></figure>

### **Mount the NFS shared Folder on Linux Client (Ubuntu Machine):** <a href="#id-6f3g4dpec7jm" id="id-6f3g4dpec7jm"></a>

**25**. On the Ubuntu machine, **verify the local IP address** and **network connectivity with the NFS server.**

<figure><img src="https://2438328698-files.gitbook.io/~/files/v0/b/gitbook-x-prod.appspot.com/o/spaces%2FPf7CIJDZ869PqrsNNvPr%2Fuploads%2FgPuudw2DUpPeJNigNvSy%2Fimage.png?alt=media&amp;token=b1609a78-cf6e-4b13-9dfd-6be2d837a70f" alt=""><figcaption></figcaption></figure>

**26.** To mount an NFS share on Linux, open terminal and run: **mkdir /data**

This command will create one directory name data under the root directory:

> <mark style="color:blue;">mount -t nfs -o mountvers=4 \<NFS-Server-IP>:/\<NFS-Shared-Folder-Name> /\<Mount-Point></mark>

To mount the NFS share `share1` from server `192.168.10.1` to `/data`, follow these steps.

In our case command will look like:&#x20;

**mount -t -o mountvers=4 nfs 192.168.10.1:/share1 /data**

**apt-get install nfs-common**

<figure><img src="https://2438328698-files.gitbook.io/~/files/v0/b/gitbook-x-prod.appspot.com/o/spaces%2FPf7CIJDZ869PqrsNNvPr%2Fuploads%2FYEs4GgD9OaMl0okywqqR%2Fimage.png?alt=media&amp;token=dead8340-12cc-457c-a5ed-6806f1c87276" alt=""><figcaption></figcaption></figure>

**mount –t nfs -o mountvers=4  192.168.10.1:/share1  /data**

<figure><img src="https://2438328698-files.gitbook.io/~/files/v0/b/gitbook-x-prod.appspot.com/o/spaces%2FPf7CIJDZ869PqrsNNvPr%2Fuploads%2FQXyaPZX9lTmftPCe77nZ%2Fimage.png?alt=media&amp;token=db6c80cc-9a5f-4941-b45c-73dc5f153f4a" alt=""><figcaption></figcaption></figure>

**28.** Verify the content of the text file which we have created earlier on the NFS server.

<figure><img src="https://2438328698-files.gitbook.io/~/files/v0/b/gitbook-x-prod.appspot.com/o/spaces%2FPf7CIJDZ869PqrsNNvPr%2Fuploads%2Fbt2IAeDIchKzwPXN6usD%2Fimage.png?alt=media&amp;token=270b0063-0c06-4385-8d4c-78fd11581707" alt=""><figcaption></figcaption></figure>